2.27 Upgrading MyID
The process for upgrading MyID depends on the version of the system from which you are upgrading.
Important: This section contains instructions for running the MyID Installation Assistant as part of an upgrade process; however, an upgrade is a significant change to your system and you must take care to ensure that you follow the appropriate procedures both before and after running the MyID Installation Assistant. See section 7, Upgrading MyID for full details on the upgrade process.
2.27.1 Upgrading from a MyID 12 system

Important: You must prepare the installation folder before you start the update process. See section 2.2.4, Upgrading or updating the MyID Installation Assistant.
To upgrade from a MyID 12 system, run the MyID Installation Assistant.
-
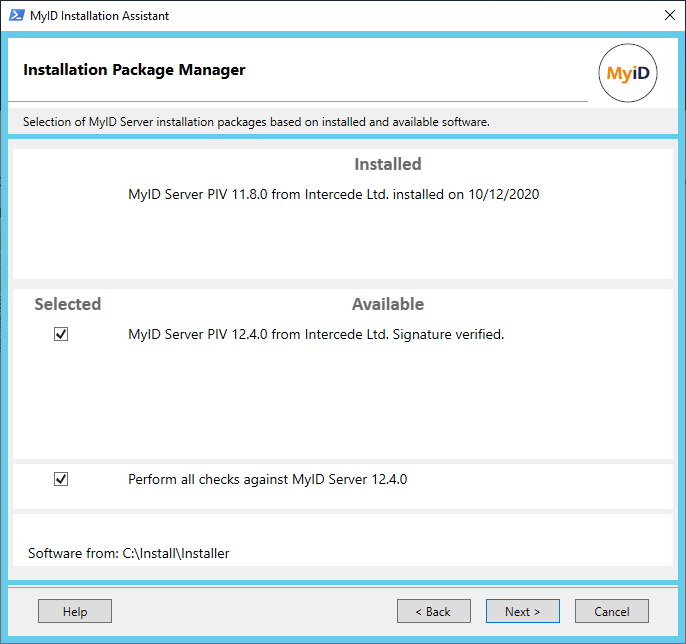
On the Intercede Package Manager screen, select the new software to be installed.
You are strongly recommended to perform all the checks for the new version. The requirements for MyID may change between versions, and this ensures that your system is suitable for the new version of MyID.
-
Click Next to proceed to the next stage.
The upgrade process follows the same process as a fresh installation of MyID.
Note: On the Select Roles and Features screen (see section 2.7, Selecting the server roles and features) make sure that the list of features you want to install is correct. The MyID Installation Assistant interrogates the registry for details of the features that are already installed, but the registry does not contain details of every feature. See section 7.1.1, Selecting features when upgrading for more information.
2.27.2 Upgrading from a MyID 11 system
MyID 11 was a 32-bit application, while MyID 12 is a 64-bit application. The MyID Installation Assistant must carry out an additional procedure to back up your configuration, uninstall your previous version of MyID, retaining the database, install the 64-bit version, then restore your configuration to the 64-bit locations on the file system and in the registry.
To upgrade from a MyID 11 system:
-
On the Intercede Package Manager screen, select the new software to be installed.
You are strongly recommended to perform all the checks for the new version. The requirements for MyID may change between versions, and this ensures that your system is suitable for the new version of MyID.
-
Click Next to proceed to the next stage.
-
Enter your MyID COM+ user details, and click Next.
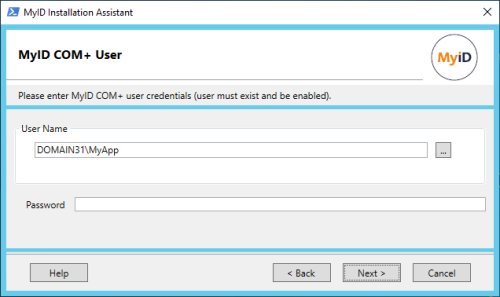
The MyID COM+ user is required to run the upgrade migration process.

-
Click Next to proceed to the next stage.
-
On the Select Roles and Features screen (see section 2.7, Selecting the server roles and features) make sure that the list of features you want to install is correct. The MyID Installation Assistant interrogates the registry for details of the features that are already installed, but the registry does not contain details of every feature. See section 7.1.1, Selecting features when upgrading for more information.
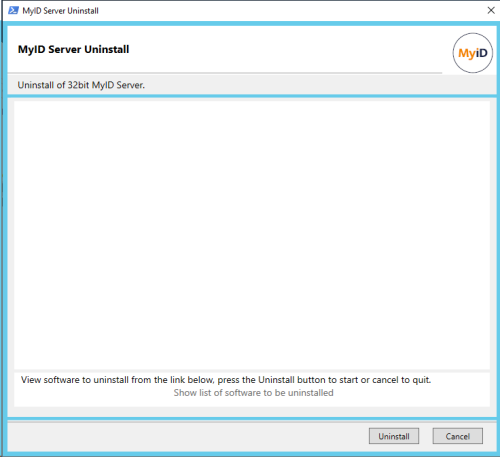
The upgrade process follows the same process as a fresh installation of MyID until the after the Pre-Installation Check Results screen (see section 2.18, Pre-installation check results), when the MyID Server Uninstall screen appears:
-
Click Show list of software to be uninstalled to open a text file listing the software that will be uninstalled, then click Uninstall to remove this software.
You must uninstall the old 32-bit software before you can install the new 64-bit software. You cannot upgrade the software in place.

-
When the uninstallation has completed, click Next to view the installation log results.
See section 2.20, Checking the installation log results.
Click Next to proceed to the next stage. If you are asked to reboot, do so, then launch the MyID Installation Assistant again.
-
Proceed with the installation of the new version.
-
After the Post-Installation Check Results screen (see section 2.22, Post-installation check results) the MyID Installation Assistant runs the next stage of the upgrade migration script to import the settings that were backed up.
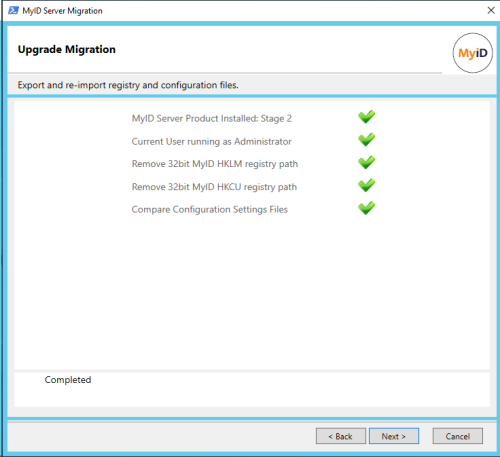
The MyID Installation Assistant also opens a text file containing a report showing any differences between the configuration files from your previous system and the files installed by the current installation program.

-
Review the changes between the configuration files; if you have made any manual changes to the configuration files, you must implement them in the current versions of the files.
This file is available under the name:
diffs.txt
in the following folder:
<install folder>\Support Tools\MyIDInstallationAssistant\UpgradeFiles\
Note: Some changes in the configuration files may be the result of enhancements to MyID since your previous version was released. If you are unsure about any changes, contact customer support quoting reference SUP-342 for assistance.
-
Click Next, and the MyID Installation Assistant runs the Server Diagnostic Report.
-
Click Next, and the upgrade is complete.


2.27.3 Upgrading from an earlier system
The MyID Installation Assistant has not been verified for upgrading from MyID 10 or earlier systems. You are recommended to carry out the upgrade process that uses the provided upgrade migration script instead of the MyID Installation Assistant to manage the upgrade process; see section 7.5, Upgrading MyID from a 32-bit application to 64-bit for details. You can use the MyID Installation Assistant to install the new version of MyID as part of the upgrade process.
2.27.4 Upgrading from MyID Professional
If you are upgrading from MyID Professional, you must carry out the uninstallation of the MyID Professional system manually, then use the MyID Installation Assistant to install the new version of MyID Enterprise.
See section 7.6, Upgrading from MyID Professional for details.